Drilling into ceramic tile isn't hard, but it's unforgiving. The right bit, speed, and cooling method make the difference between a clean hole and a cracked tile you can't unbreak. Tile type, bit choice, and technique all shift the outcome, which is why generic advice ("just drill slow") often falls short.
This guide walks through the exact steps, the tools you actually need, the variables that determine success, the mistakes that ruin tile, and when it's smarter to hand the job to a professional.
Key Takeaways
- Use a carbide-tipped or diamond bit in standard rotary mode, never hammer/impact mode
- Stabilize your starting point with tape and a center punch mark before drilling
- Keep the bit cool with water and use low RPM with light pressure
- Confirm no pipes or wiring sit behind the wall, and wear proper PPE
- Call a professional for large-format porcelain, natural stone, or load-bearing fixtures
How to Drill Into Ceramic Tile Without Cracking It
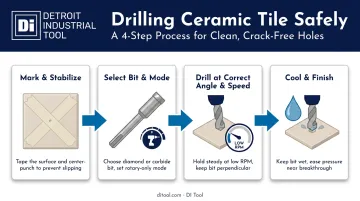
Step 1: Mark and Stabilize the Drilling Point
Ceramic glaze is smooth and slick, which means a spinning bit will wander before it ever bites in. Fix that first.
- Apply a 2-inch piece of masking or painter's tape in an X pattern directly over your mark
- Use a center punch or awl with light hammer taps to create a small pilot notch through the tape
- This notch gives the bit something to grab instead of skating across the surface
Step 2: Select the Right Bit and Drill Mode
Bit choice depends on what's actually on your wall:
- Tungsten carbide spade bit: works well for standard glazed ceramic tile
- Diamond-tipped bit: required for porcelain or natural stone tile
- Diamond hole saw: better choice for holes wider than 1/2 inch, such as those needed for pipes or drain fixtures
This Old House recommends carbide-tipped masonry bits for ceramic and diamond-tipped bits for harder porcelain or glass, confirming that the distinction matters.
Once you've picked the right bit, set the drill to standard rotary mode, not hammer or impact. For vertically installed tile, a drill guide or jig keeps the bit perpendicular and prevents the angled entry that chips edges.
Step 3: Drill at the Correct Angle, Speed, and Pressure
Start at a slight angle to help the bit dig into your notch, then straighten to vertical once a groove forms. From there:
- Keep RPM low: the exact number depends on your bit; manufacturer specs vary widely by bit size and diameter, so check the packaging
- Let the drill's weight do the work rather than pushing down
- Pause periodically to check progress and clear dust — rushing through the glaze layer is the single most common cause of cracks
Step 4: Cool the Bit and Finish Cleanly
Heat is the enemy here. Keep the bit and hole area wet using a spray bottle, wet sponge, or dripping water source. As the bit nears the back of the tile, ease off pressure to avoid blowout chips on the exit side. Wipe away debris and inspect the hole edges before installing your anchor or fixture.
What You Need Before Drilling Into Ceramic Tile
Whether the hole comes out clean or the tile cracks often comes down to prep work done before the drill ever touches the surface.
Tools & Equipment
Your core toolkit should include:
- Variable-speed drill/driver
- Correctly sized carbide or diamond bit
- Masking tape and a center punch
- Water spray bottle or wet sponge
Bit quality matters more than most people assume. Precision-coated carbide bits, such as those from DI Tool featuring ALTIN and TICN coatings, resist heat buildup and hold their edge across repeated hole-making jobs.
For dedicated tile work, DI Tool also stocks diamond hole saws in Turbo Rim and Straight Rim styles, plus Shark Series Pro diamond-coated bits from 1/8" to 6" for porcelain, granite, marble, and stone. These cover projects that span more than one tile material.
Materials & Tile Type Considerations
Tile type dictates bit choice, not the other way around. Standard ceramic works fine with carbide spade bits, while porcelain's denser composition requires diamond-tipped bits regardless of technique, since carbide alone won't cut cleanly through it.
TCNA defines porcelain tile by water absorption of 0.5% or less, which explains why it resists standard carbide bits so much better than ceramic does.
Safety & Pre-Drilling Checks
Before drilling into installed tile, use a stud finder or check installation blueprints to confirm no pipes or wiring sit behind your mark, and wear safety goggles, gloves, and a dust mask.
OSHA's eye and face protection standard exists precisely because flying fragments from drilling and cutting can cause injury, and tile shards are no exception. Even small fragments travel fast enough to cause harm.
Key Factors That Determine a Clean, Damage-Free Hole
Four variables control whether your hole comes out clean or your tile ends up in pieces.
| Factor | Why It Matters | Impact on Result |
|---|---|---|
| Drill Speed (RPM) | Excessive speed generates friction heat that cracks glaze or shatters the tile body | Staying within the low RPM range for your bit produces smoother, chip-free edges |
| Bit Type & Sharpness | A dull or wrong bit forces excess pressure, causing chips | A sharp, tile-rated carbide or diamond bit (such as DI Tool's diamond hole saws) cuts cleanly with minimal resistance |
| Applied Pressure | Pushing hard without cooling is a leading cause of cracked tile | Light, steady pressure lets the bit cut rather than force through the material |
| Cooling & Lubrication | Dry drilling builds heat fast, especially with diamond bits | Water or lubrication keeps both bit and tile cool, preventing thermal cracking |
RUBI's drilling guide identifies overheating as one of the main causes of tile cracking, tying high speed directly to excess heat and vibration. That's the core mechanism behind nearly every cracked tile: heat and force building up faster than the tile can handle.
In practice: slow speed, sharp bit, light pressure, and steady cooling work together. Skip any one of them and your risk of cracking goes up.
Common Mistakes That Crack or Chip Tile
Most tile damage traces back to one of four habits:
- Using hammer or impact mode: shock vibrations shatter brittle glaze instantly, so stick to standard rotary mode
- Skipping bit lubrication: dry drilling overheats the bit and causes hairline cracks; keep the area wet or pause every few seconds to cool it
- Drilling too fast or forcing pressure: this makes the bit skid and chip the surface instead of cutting cleanly
- Failing to stabilize the starting point: without tape or a punch mark, the bit wanders and scratches the surrounding glaze
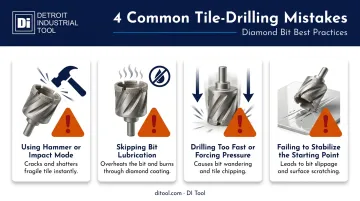
Controlled, low-speed drilling with steady pressure consistently produces better results than rushing. Slowing down gives the bit time to cut through the glaze instead of fighting it.
When to DIY vs Call a Professional
Drilling a single hole in standard wall-mounted ceramic tile, using the right bit and technique, is a safe and cost-effective DIY task for most homeowners. You don't need special equipment beyond what's listed above.
Professional help is worth the cost when:
- The project involves large-format porcelain or natural stone
- You're installing a load-bearing fixture, such as a grab bar
- The tile is valuable or rare, and a cracked piece would be expensive to replace
If you're mounting something lightweight, like a small hook or decoration, adhesive-mounted hooks or anchors avoid the drilling risk entirely. For larger openings, such as plumbing or fixture cutouts, professionals often use diamond core drill machines for cleaner results than a standard hand drill. This equipment isn't something most DIYers own or need for a single project.
Frequently Asked Questions
Can you drill into ceramic tile without cracking it?
Yes. Cracking is avoidable with the correct bit, low RPM, light pressure, and consistent cooling. Most cracks happen from rushing the job or using a hammer drill setting.
What is the best drill bit for ceramic tile?
A tungsten carbide spade bit works well for standard ceramic. Diamond-tipped bits are the safer choice for porcelain or mixed tile projects.
Should I use a hammer drill on tile?
No. Hammer or impact mode delivers vibration that shatters glaze. Standard rotary drilling is required for tile of any kind.
Do I need to drill wet or dry?
Wet drilling with diamond bits keeps temperatures low and extends bit life. Some dry diamond bits include built-in cooling features for higher-speed use without water.
How do I stop my drill bit from slipping on tile?
Apply masking tape in an X pattern over your mark, then add a center punch notch. This gives the bit a stable starting point instead of a slick glaze surface.
Can I drill into tile after it's installed on the wall?
Yes, this is common and safe when you follow proper marking, bit selection, and cooling steps. Take extra care near grout lines, since they're more fragile than the tile body itself.