Porcelain is classified by ANSI A137.1:2022 as tile with water absorption of 0.5% or less. That low porosity is exactly what makes it so tough to drill cleanly.
Cutting a hole in porcelain looks like a basic drilling task. In practice, your results depend on the bit, the speed, the cooling method, and how much pressure you apply. Get any one of those wrong and you're left with a cracked tile.
This guide walks through the full process: tools, technique, the variables that actually matter, common mistakes, and alternative cutting methods for jobs where a hand drill isn't the right fit.
Key Takeaways
- Diamond-tipped tools are essential; carbide and masonry bits can't cut porcelain's dense surface
- Water cooling, low speed, and steady pressure prevent the cracking that ruins most cuts
- Hole saws suit round openings, grinders tackle irregular shapes, and waterjets serve fabrication shops
- Most failed cuts trace back to skipped prep, not bad luck
How to Cut Holes in Porcelain Tile: Step-by-Step Guide
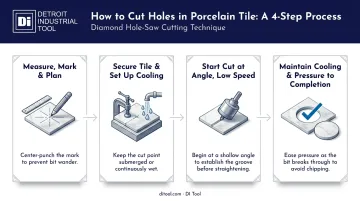
Step 1: Measure, Mark, and Plan the Hole
Start with exact measurements. Pull the diameter from your fixture's installation sheet rather than guessing from the pipe size alone.
A Moen tub and shower valve, for example, calls for a finished wall opening between 2-1/4 and 3-1/2 inches depending on the model, while a comparable Kohler valve needs a full 4 inches. Same general fixture, different holes.
Mark the center point with a permanent marker, then:
- Apply painter's tape over the mark to give the bit traction on the glazed surface
- Check the placement against studs, pipes, or wiring behind the tile before you drill
- Confirm the tile isn't already cracked or compromised near the mark
Skipping this step is where most bad cuts begin, long before the drill ever touches the tile.
Step 2: Secure the Tile and Set Up Your Tools
Loose tile vibrates. Vibration cracks porcelain. Set the tile on a stable, cushioned surface such as plywood or a rubber mat before you do anything else. This absorbs shock and keeps the piece from shifting mid-cut.
A drill guide or jig keeps the bit centered and prevents wandering, especially on glossy glazed surfaces where a bit can skate sideways on first contact. If you don't have one, a steady clamp and a slow start do most of the same work.
Set up your water source now, not after you've started cutting:
- A spray bottle for manual, on-demand cooling
- A wet sponge you can press against the cutting area
- A water-fed guide attachment for continuous flow on longer cuts
Step 3: Start the Cut at a Controlled Angle and Low Speed
Begin at a slight angle for many hole saw types, letting the diamond edge bite into the glaze without skating across it. Some bits are designed to start straight instead. Check your specific bit's instructions, since technique varies by design.
Once a shallow groove forms, gradually level the tool to a full vertical position. Keep the RPM low through this entire phase, and if your hole saw has a pilot bit, let it guide the cut fully before adding pressure. This is the single most common point where operators rush and chip the surface glaze before the cut has even really started.
Step 4: Maintain Cooling and Steady Pressure Through Completion
Let the diamond grit do the cutting. Apply consistent, moderate pressure — forcing the tool only generates more friction and raises your odds of cracking the tile.
- Keep water flowing throughout the entire cut, not just at the start
- Clear slurry and debris periodically so you can see your progress
- Watch for a change in sound or resistance, which usually signals you're through
- Lightly sand or deburr the finished edge for a clean, professional-looking hole
What You Need Before Cutting Holes in Porcelain Tile
Preparation and tool selection decide most of the outcome before you even pick up the drill. Porcelain doesn't forgive shortcuts the way softer materials do.
Tools and Equipment Requirements
Your core toolkit should include:
- A diamond hole saw or core bit sized correctly for the fixture
- A variable-speed drill or angle grinder
- A water cooling system or a water-fed drilling guide
Generic hardware-store bits often wear out fast or generate excess heat on porcelain's dense body. Sourcing diamond-coated bits from a dedicated cutting tool supplier, such as DI Tool, tends to improve consistency between cuts and extend how long the bit lasts.
DI Tool's Shark Series core bits, for instance, are built for both wet and dry operation. This gives you flexibility without needing a separate water attachment.
Materials, Surface Prep, and Safety
Match your bit type to the tile's thickness and density before you start. A thin wall tile and a thick floor porcelain paver don't cut the same way, even with the same bit.
Also make sure there's a supportive backing board underneath the tile. Unsupported porcelain flexes slightly under pressure, and that flex is often what causes hairline cracks radiating from the hole.
Skill matters just as much as setup. Practice on a spare tile offcut first if you've never cut porcelain before, since it's cheap insurance against ruining an installed tile.
Before starting, put on:
- Safety goggles
- Work gloves
- A dust mask, especially for dry cuts
Key Parameters That Affect Results When Cutting Holes in Porcelain
Even with the right bit in hand, your outcome depends on how well you control a handful of variables during the cut itself.
| Parameter | Why It Matters | Impact on Quality |
|---|---|---|
| Drill/grinder speed | Excessive RPM generates heat and vibration that crack dense porcelain | Most wet bits run best at 400-1,000 RPM—verify your bit's rated speed before cutting |
| Water cooling | Porcelain's density causes fast heat buildup that stresses both the tile and the bit | Continuous or dip-based water use (depending on the bit) extends diamond life and limits thermal cracking |
| Applied pressure | Forcing the tool raises friction and shatter risk | Letting the diamond grit grind naturally produces smoother, rounder holes |
| Bit and grit quality | Worn or low-grade diamond bits run hotter and cut rougher | Sharp, well-coated bits cut faster with fewer passes |
MK Diamond's troubleshooting guidance points to a specific combination as the usual culprit behind bit failure: too much feed pressure paired with too little water. Correct sluggish or overheating cuts by:
- Easing off feed pressure
- Increasing water flow
Bit quality matters just as much as technique here. A worn diamond edge forces you to compensate with more pressure or speed, which then compounds the very problems you're trying to avoid. DI Tool's diamond hole saws use laser-welded, turbo-segment construction designed to resist that kind of premature wear.
When to Use This Method & Alternative Techniques
Diamond hole saws and drills aren't always the right call. The best method depends on hole size, tile thickness, and how many holes you're cutting.
Typical use cases for hole saws:
- Plumbing penetrations and shower valve openings
- Electrical outlet cutouts
- Mounting holes for towel bars, mirrors, or grab bars
Where a hand drill becomes inefficient:
- Very large or irregular cutouts
- Thick outdoor pavers
- High-volume production runs where a single drill is too slow
When these limits apply, consider these proven alternatives:
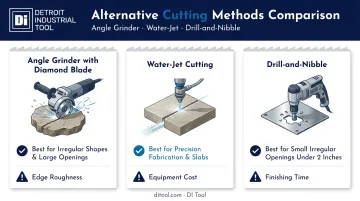
Alternative Method: Angle Grinder with Diamond Blade
Better for irregular shapes, larger openings, or job sites without a reliable water source. A porcelain-rated blade, like DI Tool's J-Slot Premium Diamond Blade, is built for chip-free cutting on porcelain and granite. The trade-off: it demands a steady hand and more finishing work than a hole saw delivers. Plan for extra cleanup time on cutouts over 2 inches.
Alternative Method: Water-Jet Cutting
Better suited to complex patterns or precision fabrication on slabs and countertops. Equipment costs put this mainly in professional fabrication shops rather than on-site jobs. Most shops price by the cut, making it worthwhile mainly for high-volume or intricate orders.
Alternative Method: Drill-and-Nibble
Useful for small, irregular openings when you don't have a properly sized hole saw on hand. Expect rougher edges that need extra finishing work afterward. This works best on openings under 2 inches; larger cuts risk cracking the tile.
Common Mistakes and Troubleshooting While Cutting Holes in Porcelain
Common Mistakes to Avoid
- Skipping tile marking and stabilization before drilling
- Using standard masonry or spade bits instead of diamond-tipped tools like DI Tool's diamond hole saws or tile blades
- Running the drill dry or at high speed to rush the job
- Pressing down hard instead of letting the diamond grit work
Troubleshooting Common Issues
| Problem | Likely Cause | What to Adjust |
|---|---|---|
| Bit wandering off the mark | No traction or guide used | Add painter's tape or a drilling guide, restart at low speed |
| Tile cracking around the hole | Unsupported tile or excess pressure | Add backing support, reduce pressure |
| Bit overheating or wearing fast | Insufficient water cooling or a worn diamond bit | Increase water flow, swap in a fresh quality bit |
Frequently Asked Questions
What tool is best for cutting holes in porcelain tile?
A diamond hole saw is generally best for small-to-medium round holes. Core bits or angle grinders suit thicker pavers and irregular cuts better.
Can you drill porcelain tile with a regular drill bit?
No. Standard masonry or spade bits can't handle porcelain's hardness and will likely fail to penetrate the surface or crack the tile trying.
Do you need water when drilling porcelain tile?
Water cooling is essential for most diamond bits. It prevents overheating, extends bit life, and lowers the risk of thermal cracking.
How do you stop porcelain tile from cracking when drilling?
Use diamond tools, keep speeds low, apply steady rather than forceful pressure, and make sure the tile is fully supported from underneath.
What size hole saw do I need for a shower valve or pipe?
Measure the pipe or fixture diameter first, then check the manufacturer's installation sheet. Sizes vary by fixture, so choose a saw slightly larger to allow for trim fittings.
Can you cut a hole in porcelain tile after it's already installed?
Yes, using the same diamond tools and technique. Take extra care to protect surrounding grout lines and adjacent tiles from vibration and pressure damage.