
In practice, results vary a lot. The tool you use, the blade's condition, the tile material, and your cutting technique all affect whether you end up with a clean joint or a chipped, cracked mess. Many DIYers and even some pros struggle with glaze chipping right at the visible edge, where it's hardest to hide.
This guide walks through the step-by-step process, the tools you'll need, the variables that actually control cut quality, common mistakes, troubleshooting fixes, and a few alternatives worth considering before you commit to mitring.
TL;DR
- Use a stable wet saw, angle grinder, or manual cutter with a miter-capable diamond blade
- Slow, steady cutting speed prevents most chipping and torn edges
- Best suited to porcelain, ceramic, and large-format tiles on backsplashes and countertop edges
- Careful marking and secure setup prevent the majority of cutting failures
- An angle jig improves repeatability over freehand cutting on bigger jobs
How to Cut Tiles at a 45-Degree Angle: Step-by-Step Guide
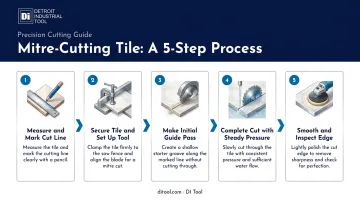
Step 1: Measure and Mark the Cut Line
Measure the tile edge and mark a 45-degree line using a speed square, angle guide, or combination square. A pencil and a steady hand work, but a scored line is more visible once you're at the saw.
Double-check the angle before cutting. Small marking errors don't stay small: they compound at mitered corners, where two pieces need to meet flush. Measure twice; it costs nothing and saves a tile.
Step 2: Secure the Tile and Set Up the Cutting Tool
Stabilize the tile on the wet saw table or workbench so it can't shift mid-cut. Any movement here transfers straight into the edge as a jagged line.
Before you start:
- Confirm the blade is rated for angled or side cutting, not just straight cuts
- Inspect for damage, glazing, or excessive wear on the diamond segments
- Check that the saw table and fence are locked in position
Step 3: Make the Initial Guide Pass
Run a light, shallow first pass along the marked line to establish a guide groove before cutting all the way through. This gives the blade a track to follow on the deeper pass, rather than fighting to stay on line from a standing start.
Skipping this step is fine on short, simple cuts. On longer miters or unfamiliar tile, it reduces the chance of the blade wandering off your mark.
Step 4: Complete the Cut with Controlled, Steady Pressure
Feed the tile or blade slowly and let the diamond segments do the work. Forcing the cut is the fastest way to chatter, chip, or crack the tile.
For wet saws, keep continuous water flow on the blade throughout the cut. This isn't optional: OSHA requires an integrated water system that continuously feeds the blade on covered masonry-saw tasks, operated per the manufacturer's instructions. For dry cutting with a grinder, dust control matters just as much: overheating without water or extraction leads directly to glaze chipping.
Step 5: Smooth and Inspect the Finished Edge
Finish the mitered edge with a fine-grit diamond hand pad to knock down micro-chips. A few light passes usually do it.
Before installation, dry-fit the two mitered pieces together at the corner. You're checking for:
- A tight, flush joint with no visible gap
- Matching angles on both pieces
- No chips along the visible edge
If the joint doesn't sit flush, re-mark and recut rather than forcing it into place with extra grout or caulk.
When to Use This Method & What You'll Need
When a 45-Degree Cut Is the Right Approach
Miter cuts work best on exposed tile edges, including backsplashes, shower niches, and countertop edges, where you want a clean finish without a visible metal strip. They give a continuous, seamless look that trim profiles simply can't match.
That said, mitering gets riskier with very thin, brittle, or heavily textured tiles. The thinner the material, the less margin for error, and textured surfaces make it harder to get a clean, chip-free line. In those cases, trim or an alternate finish may be the safer call.
Equipment and Material Requirements
Core tools for the job:
- Wet tile saw or angle grinder with a miter/side-grinding capable blade
- 45-degree angle guide or jig
- Safety gear: goggles, gloves, dust mask
Blade choice matters more than most people expect. Standard diamond cutting-off wheels aren't built for lateral load. Safety guidance from the Organisation for the Safety of Abrasives is explicit: side pressure and grinding should only be applied with blades the manufacturer has designed for it. A straight-cut blade forced into a miter will flex, chip, and wear unevenly.
At DI Tool, we stock a range of tile-cutting blades, including turbo rim and continuous rim styles suited to porcelain, ceramic, and granite work. If you're planning miter or side-grinding cuts, confirm with the product spec or our team which blades are rated for that use.
Not every blade on the shelf is built for lateral load, and running the wrong one is how good tile turns into scrap.
Porcelain and large-format tiles add another wrinkle: they need blades with enough diamond segment height and stability to hold up under repeated lateral pressure across a longer cut.
Key Parameters That Affect Your 45-Degree Cut Quality
Consistent miter cuts come down to controlling a handful of variables, not luck or years of experience alone.
Blade Type and Stability
A blade designed for side-grinding resists flexing under lateral load. Standard straight-cut blades weren't engineered for that stress, and they show it: uneven, torn edges are the usual result when you push a general-purpose blade into miter work.
Cutting Speed
Slow, steady feed rates let the diamond segments grind the material rather than tear it. Crossville's fabrication data illustrates the point well: its guidance calls for 500 to 750 mm/min on 45-degree miter cuts, compared to 1,000 to 1,500 mm/min on straight cuts in large-format porcelain slab fabrication. Rushing the feed is the single most common cause of micro-chipping.
Angle Consistency
A jig or attachment holds the angle steady for the full length of the cut. Freehand cutting invites drift, even from experienced hands, and that drift shows up as a mismatched joint the moment you set the two pieces together at the corner.
Tool Condition and Vibration
A worn or wobbling grinder or saw sends vibration straight into the tile edge. That vibration compounds across multiple cuts, undermining repeatability on an entire job rather than just one, which is a bigger problem on multi-tile installs than on a single fix.

Common Mistakes and Troubleshooting
Most miter-cutting failures trace back to a small set of avoidable errors.
Common mistakes:
- Applying excessive pressure or forcing the blade through the tile
- Using a blade not rated for side-grinding or miter cuts
- Skipping the guide pass or angle-marking step
- Ignoring water flow or dust control, which leads to overheating
Troubleshooting guide:
| Problem | Likely Cause | Fix |
|---|---|---|
| Chipped or torn glaze along the edge | Cutting too fast, or a worn/glazed blade | Slow the feed rate; inspect and dress or replace the blade |
| Mismatched miter joint at the corner | Inconsistent angle during the cut | Check jig alignment; re-mark the line before recutting |
| Tile cracking mid-cut | Insufficient support or clamping | Confirm the tile is fully stabilized before the blade touches it |
If you're seeing repeat problems across multiple tiles rather than one bad cut, the issue is usually systemic. Check the blade, the saw table, and your feed speed together instead of blaming a single variable.
Alternatives to Cutting Tiles at 45 Degrees
Mitring isn't always the right call, especially for beginners or with certain tile types. Consider these alternatives instead:
- Metal or PVC edge trim (Schluter-style): Works well for thin, brittle, or textured tiles where mitring risks cracking, though it leaves a visible trim line.
- Bullnose or pre-finished edge tiles: Skips on-site mitring entirely when your tile line offers a factory-finished edge, though options are limited to specific collections and add material cost.
- Professional fabrication services: Handles large-format porcelain or sintered stone slabs that need specialized equipment and reinforcement, at a higher cost and longer lead time than cutting on site.
Frequently Asked Questions
Can you cut tile at a 45-degree angle?
Yes. Most porcelain and ceramic tiles can be cut at 45 degrees using a wet saw or angle grinder fitted with a miter-capable diamond blade. Thin or brittle tiles need extra care and a slower feed rate.
What is the 3-4-5 rule for tile?
It's a method for verifying a true 90-degree corner using a triangle with sides of 3, 4, and 5 units (or any multiple). If those measurements line up, your corner is square, which matters for mitered pieces meeting cleanly.
What is a tile cut at a 45-degree angle called?
This cut is commonly called a "miter cut" or "jolly cut." It creates a finished edge at outside corners without needing metal trim.
What blade should I use to cut tile at 45 degrees?
Use a diamond blade specifically rated for side-grinding or miter cuts. Standard straight-cutting blades flex and chip more easily under lateral pressure.
Can I cut a 45-degree tile edge with an angle grinder instead of a wet saw?
Yes, with a stable, low-vibration grinder and a blade rated for side grinding. A wet saw or dedicated jig usually gives better control and more consistent results.
Do I need a special jig or attachment to cut tiles at 45 degrees?
It's not mandatory, but a jig improves angle consistency and reduces fatigue, especially on larger projects or if you're still building up experience with miter cuts.