But cutting these slabs isn't like cutting a standard 12x12 tile. Large-format pieces are heavy, brittle, and quick to crack if you rush the job or use the wrong tool. Your results depend almost entirely on the cutting method you choose and how carefully you execute it.
This guide walks through manual score-and-snap cutting, electric diamond blade cutting, how to pick between them, the equipment you'll need, and the mistakes that ruin the most tiles.
Key Takeaways
- Manual score-and-snap cutters cut fastest, handling 12mm to 22mm tiles depending on model
- Electric diamond blade cutters handle thick porcelain, stone, notches, and miters that manual tools can't
- A clean scoring pass plus solid tile support prevents most cracks and chips
- Wet cutting produces far less airborne silica dust, making it safer indoors
How to Cut Large-Format Tile Using a Manual Cutter
Manual cutters remain the go-to for straight cuts on standard glazed ceramic and mid-thickness porcelain. Here's how to get a clean break every time.
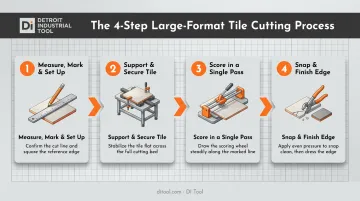
Step 1: Measure, Mark, and Set Up
Mark your cutting line with a pencil and straightedge, not a marker that can smudge under pressure. Before scoring anything, confirm the cutter's rail length matches or exceeds the tile's dimension.
Check the scoring wheel for sharpness and alignment. A worn or misaligned wheel is the single most common cause of a failed cut before you've even started scoring.
Step 2: Support and Secure the Tile
Set the tile on a stable, level workbench or a dedicated large-format cutting table. Any flex in the surface underneath translates directly into stress on the tile.
Suction cup handles help position slabs without applying uneven pressure. Grabbing a large tile by its edges alone can pre-stress the material before you've made a single pass.
Step 3: Score the Tile in a Single Pass
Apply firm, even pressure with the scoring wheel along the entire cutting line in one continuous pass. Going back over the line a second time doesn't fix a weak score. It weakens the tile's surface further and invites jagged breaks.
Consistency matters most on longer slabs. Hand fatigue tends to creep in around the 30-inch mark, so keep your pace and pressure steady from start to finish.
Step 4: Snap and Finish the Edge
Use a large-format tile breaker, typically featuring a 1-1/2-inch throat, to apply even pressure across the entire scored line. This distributes force uniformly instead of concentrating it at one point.
Inspect the finished edge for chips. A light pass with a rubbing stone smooths minor imperfections without compromising the cut line.
Manual cutter capacity varies by model:
- RUBI's FAST cutter: up to 12mm for standard stoneware
- RUBI's TZ model: up to 21mm for heavier porcelain
- Montolit's Masterpiuma P3: rated up to 22mm
Always check your specific cutter's rating rather than assuming a universal limit.
How to Cut Large-Format Tile Using an Electric Cutter
When thickness, material, or cut geometry exceeds what a manual cutter can handle, an electric diamond blade cutter takes over.
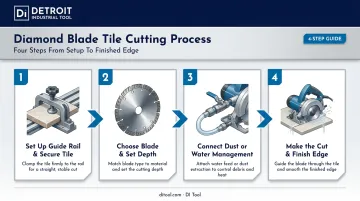
Step 1: Set Up the Guide Rail and Secure the Tile
Attach the guide rail using suction pads or clamps, lining it up precisely with your marked cutting line. Any misalignment here shows up in the finished cut.
Confirm the tile sits on a flat, fully supported surface with zero overhang. Overhang causes vibration mid-cut, which is a leading cause of chipped edges on brittle porcelain.
Step 2: Choose the Right Blade and Set Cutting Depth
Blade selection depends on material:
- Porcelain and ceramic: A continuous turbo-rim blade, like DI Tool's J-Slot Premium Diamond Blade, cuts smoother with less chipping thanks to its heat-dissipating slots
- Hard porcelain specifically: A dedicated turbo porcelain blade with semi-wide turbo teeth cuts efficiently in both wet and dry setups
- Natural stone: A turbo or segmented blade rated for granite and hard stone, segmented rims aren't built for finish-grade glazed tile
Set blade depth slightly deeper than the tile thickness. If you need a mitered edge, confirm your saw's angle setting. Most tilting heads offer 22.5° and 45° positions, though exact depth at 45° varies by model.
Step 3: Connect Dust or Water Management
Attach a dust extractor for dry cutting, or engage the water-fed system for wet cutting. Wet cutting is the stronger choice for silica control, and we'll cover why in the safety section below.
Check hose connections and extractor settings before you start. A poorly seated hose or the wrong filter mode leaves you cutting blind in a cloud of dust.
Step 4: Make the Cut and Finish the Edge
Guide the cutter along the rail at a slow, steady feed rate. Let the diamond edge do the work. Forcing the blade only causes chipping and premature wear.
After the cut, inspect the edge for chipping and clean off any dust or water residue before handling the tile further.
Manual vs Electric: Which Method Should You Choose?
Thickness and material are the primary deciding factors. Manual cutters handle most tiles up to roughly 15-21mm, but thicker porcelain slabs generally need a diamond blade, such as DI Tool's tile blades built for reinforced porcelain and stone.
| Factor | Manual Cutter | Electric Cutter |
|---|---|---|
| Straight cuts on standard tile | Faster, cleaner | Usable, but slower to set up |
| Thick porcelain or stone | Limited by model rating | Preferred |
| Notches, curves, miters | Not possible | Required |
| Portability | High, no power needed | Lower, needs power and water/dust setup |
| Best for | Small jobs, one-off cuts | Higher-volume or complex jobs |
Job volume matters too. A one-off cut on a single slab rarely justifies setting up a wet saw with water management. But if you're cutting dozens of tiles with L-cuts and outlet notches, the electric cutter earns its setup time fast.
What You Need Before You Start: Equipment, Materials & Safety
Preparation determines whether your tile survives the cut. Rushing setup is where most large-format jobs go wrong.
Equipment Requirements
Core equipment includes:
- A manual rail cutter sized to your tile, or an electric circular/diamond cutter with a guide rail
- A tile breaker built for large-format slabs
- A stable, flat work table
- Suction cup lifters and a transport cart for handling heavy pieces
Scoring wheel and blade quality matter more than most people expect. A dull scoring wheel or a generic blade increases chipping risk. Precision tile blades, such as DI Tool's Turbo Porcelain and Ring Saw diamond blades, are built specifically for clean edges on porcelain, ceramic, and stone rather than general-purpose cutting.
Confirm the tile type, porcelain, ceramic, or natural stone, and its thickness before picking a cutting method. Compatibility varies by tool and blade, and guessing wrong here means a ruined tile.
Safety Readiness
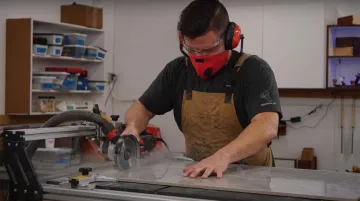
Wear safety glasses, ear protection, and a dust mask or respirator. Slabs over roughly 5 square feet call for two-person lifting to avoid dropped-tile accidents and back injuries.
Silica dust is a real health hazard on cutting jobs. OSHA's respirable crystalline silica standard sets a permissible exposure limit of 50 micrograms per cubic meter as an 8-hour average, with continuous water delivery listed as the required control method for both stationary and handheld saws. This is exactly why wet cutting matters for indoor or prolonged jobs.
Common Mistakes and Troubleshooting
Most cracked or chipped large-format tiles trace back to a handful of avoidable errors.
Common Mistakes
- Scoring multiple times instead of one clean pass, which weakens the surface and causes jagged, uncontrolled breaks
- Cutting without adequate support, letting the tile flex and crack mid-cut
- Using a dull or wrong-type blade or wheel for the material, leading to chipped or rough edges
Troubleshooting Common Issues
| Problem | Likely Cause | Fix |
|---|---|---|
| Tile cracks unevenly after snapping | Uneven pressure during scoring or snapping | Re-check pressure consistency across the full length before your next cut |
| Chipped or rough edge | Dull scoring wheel or wrong blade type | Replace the wheel or switch to a blade rated for your specific material, such as a DI Tool tile blade |
| Excessive dust or poor visibility | Dust extraction not connected properly, or wrong mode selected | Check hose fit and switch to wet cutting if the setup allows |
A TCNA-commissioned risk assessment found manual score-and-snap cutting produced roughly 50 times less measurable dust than wet saw cutting, and about 1,000 times less than uncontrolled dry saw cutting. If dust visibility is a persistent problem on electric cuts, switch to wet cutting; it directly controls airborne dust at the source.
Conclusion
Both manual and electric cutting deliver clean results on large-format tile when you pair the right tool with proper support and a single controlled cutting motion. The method matters less than the execution.
Most cracked or chipped tiles come down to skipped preparation, worn scoring wheels or blades, or a rushed cut, not a flaw in the method itself. Investing in quality cutting components, like DI Tool's precision-engineered scoring wheels and diamond blades built for the specific material you're cutting, makes a measurable difference in edge quality and how long your tools last.
Frequently Asked Questions
What is considered a large-format tile?
Industry convention, including TCNA guidance, treats any tile with one side longer than 15 inches as large-format. This covers common sizes like 24x48-inch porcelain panels and larger slabs.
Can I cut large-format porcelain tile with a manual cutter?
Yes, up to a point. Most manual cutters handle porcelain in the 12mm to 21mm range depending on the model, but thicker slabs typically need an electric diamond blade cutter.
What is the best blade for cutting large-format tile electrically?
A continuous turbo-rim diamond blade works well for porcelain and ceramic, while natural stone needs a blade specifically rated for granite or hard stone. Blade quality directly affects chipping and cut precision.
How thick can a manual tile cutter cut?
Capacity is model-specific, ranging from about 12mm on standard cutters up to 22mm on heavy-duty models. Always check your cutter's rated maximum rather than assuming a universal limit.
Is wet cutting better than dry cutting for large tiles?
Wet cutting reduces airborne silica dust and is generally safer, especially indoors. Dry cutting is workable for short jobs, but only with proper dust extraction in place.
How do I prevent cracking when cutting large-format tiles?
Score the tile in a single, even pass and make sure it's fully supported on a stable surface throughout the cut. These two factors prevent the majority of cracks regardless of which method you use.