The core challenge isn't hardness. It's the way glass responds to stress. Microscopic surface cracks act as stress concentrators, and any vibration, excess heat, or unsupported flex during cutting can propagate those cracks into chips, splits, or complete breaks.
The good news: clean cuts are entirely achievable. Tool choice, blade type, feed speed, and how you support the tile during the cut are the four variables that control your results. Get those right, and glass tile cuts about as cleanly as anything you'll work with.
This guide covers the tools you need, four cutting methods ranked by application, the parameters that actually determine cut quality, and how to fix the most common problems.
Key Takeaways
- A wet saw with a continuous-rim diamond blade rated for glass is the most reliable tool for clean, straight cuts
- Chips and cracks trace back to the wrong blade, too much feed pressure, or inadequate tile support
- Feed slowly: let the blade pull the tile through, don't push it
- Always smooth cut edges with a rubbing stone before installation
- Never skip safety goggles — glass fragments travel farther and smaller than ceramic shards
What You Need Before Cutting Glass Tile
Preparation determines cut quality before you touch a blade to tile. A disorganized setup or the wrong blade will cause more failures than technique alone.
Tools and Equipment
Cutting tools:
- Wet saw with a continuous-rim diamond blade rated for glass (fine or ultra-fine grit — this is the single most critical equipment decision)
- Manual glass scoring wheel with a tungsten carbide wheel
- Running pliers or grozing pliers (for snapping scored tiles)
- Wheeled mosaic nippers with carbide wheels (for curved or detail cuts)
- Washable marker and straightedge for marking cut lines
Finishing tools:
- Rubbing stone or diamond hand pad for edge smoothing
On blade selection: manufacturers including MK Diamond and QEP specify fine and ultra-fine grit, continuous-rim construction specifically for glass tile cutting.
DI Tool stocks a dedicated Glass Tile Diamond Blade engineered for glass and tile applications. It's a distinct product from their porcelain and ceramic blade lines — glass fractures under cutting pressure in ways those materials don't, which is why the blade design differs.
Safety gear:
- Safety goggles — glass fragments travel at high velocity
- Cut-resistant gloves — nitrile palm-coated or cut-resistant micro foam nitrile are both appropriate
- Dust mask for any grinding or edge-smoothing work
Workspace and Tile Readiness
Set up on a stable, flat workbench with a drop cloth underneath to catch fragments. Before cutting, lay tiles out in their dry layout pattern so you can plan exactly where each cut falls. Position cut tiles so sliced edges land in hidden locations — along cabinet undersides, inside corners, or behind trim — where the layout permits.
How to Cut Glass Tile Step by Step
The right method depends on your project scale, cut type, and tile size. These four methods cover the full range.
Method 1: Wet Saw (Best for Straight Cuts, Large Projects)
The wet saw is the most reliable option for clean, repeatable straight cuts on full-sized glass tile.
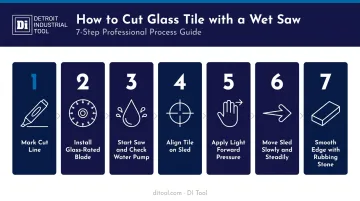
- Mark the cut line with a washable marker
- Install a continuous-rim diamond blade rated for glass (not a ceramic or porcelain blade)
- Start the saw and confirm the water pump is running steadily before feeding any tile
- Align the tile on the sled with the cut line centered on the blade
- Apply light, even forward pressure — let the blade do the work, don't push
- Move the sled slowly and steadily away from you; the tile should advance when the blade pulls it, not when you force it
- Power down, then wipe away marker residue and smooth the cut edge with a rubbing stone using light circular pressure while the edge is wet
For back-painted glass tile: cut face-side down. Montolit's guidance specifically recommends this orientation to prevent chipping the painted surface, which is the visible face after installation.
Method 2: Manual Scoring Wheel (Best for Small Tiles, Controlled Straight Cuts)
- Mark the cut line and position a straightedge beside it
- Press the scoring wheel firmly onto the tile surface at the far end
- Pull toward you in one smooth, uninterrupted stroke — you should hear a distinct crackling sound confirming the score line penetrated the glass surface
- Snap the tile using running pliers (center ridge directly over the score) or grozing pliers (grip waste section parallel to the cut, snap downward)
- Smooth the cut edge with a rubbing stone
One pass, executed confidently, beats multiple light passes. If the score line is incomplete, you cannot fix it by going over it again: the break will be ragged regardless.
Method 3: Wheeled Mosaic Nippers (Best for Curved and Detail Cuts)
- Mark the cut guideline and put on safety goggles — nippers eject fragments sideways
- Position the carbide wheels directly on the cut line, tool close to the work surface
- Squeeze with firm, decisive force
- Work in small increments from the tile edge toward your target line — don't try to remove large sections at once
- Smooth all nipped edges with a diamond hand pad; nippers leave rougher edges than any other method
Method 4: Wet Saw + Scoring Combination (Best for Curves Around Pipes or Obstacles)
- Mark the curved cut line with a washable marker
- Score along the curve freehand with a handheld glass scoring wheel
- Use the wet saw to make a series of straight relief cuts perpendicular to the scored curve, spaced approximately 3/8 inch apart, cutting only through the waste portion, not across the scored line
- Use grozing pliers to snap off each narrow spoke of glass one at a time
- Smooth the curved edge thoroughly with a rubbing stone
Key Parameters That Affect Cut Quality
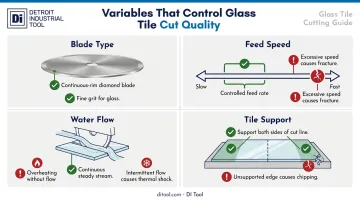
Most chipping and cracking failures aren't random. They're the predictable result of specific variables being out of control.
Blade Type and Grit
Glass tile is non-porous and brittle, so it fractures from vibration rather than gradual abrasion. QEP directly links continuous-rim construction to minimized chipping on glass tile blades, and Norton identifies segmented, flat continuous rim, and turbo corrugated continuous as distinct categories — they're not interchangeable.
What the wrong blade looks like in practice: consistent chipping on both the top and bottom face of the cut. The correct blade should leave an edge that needs only light smoothing.
Blade selection rule: glass-rated, continuous-rim diamond blade with fine or ultra-fine grit. Not a segmented masonry blade. Not a general tile blade.
Feed Speed
Feeding too fast creates lateral pressure that fractures the glass ahead of the blade. The distinction matters: slow, steady advancement lets the blade do the work, while forcing the tile forward produces diagonal cracks or mid-tile breaks.
- Too fast: lateral pressure builds ahead of the blade, causing fractures
- Too slow: rarely a problem, but increases heat at the cut line
- Right pace: the blade pulls the tile through with minimal hand pressure
Water Flow and Blade Cooling
The water stream on a wet saw does two things: lubricates the blade and cools the cut edge. Cutting with insufficient water causes heat buildup that produces a micro-cracked, frosted appearance along the cut line. That's not just cosmetic — thermal stress from uneven heating creates tensile stress in glass, and cracks spread rapidly once critical stress intensity is exceeded. Maintain steady, continuous water flow on both sides of the blade throughout the cut.
Tile Support and Stability
Unsupported glass tile flexes under cutting pressure, and any flex creates a stress fracture that propagates from the cut line into the tile body. The tile must be fully supported on both sides of the cut line throughout the cut. Use the wet saw sled, a flat backing board, or a steadying hand to maintain even contact with the work surface at all times.
Common Mistakes When Cutting Glass Tile
Four mistakes account for most cracked and chipped glass tile cuts:
- Wrong blade: Ceramic or porcelain blades create vibration that shatters glass. A glass-rated continuous-rim blade has an unbroken edge around its full circumference — if you can see gaps or segments, it's the wrong blade.
- Interrupted score line: One incomplete scoring pass creates an uneven stress line that breaks ragged. You cannot re-score to fix it. One confident, continuous stroke with consistent pressure is the standard.
- Unsmoothed edges: Sharp micro-projections along cut edges concentrate stress during thermal cycling or minor substrate movement, causing cracks after installation. Smooth every cut edge before it goes on the wall.
- No eye protection: Glass tile fragments are smaller and travel farther than ceramic or porcelain shards. Goggles are non-negotiable when using nippers or a wet saw.
Troubleshooting Glass Tile Cutting Problems
Even with the right blade and setup, cuts don't always go cleanly. Here are the three most common problems and how to fix them.
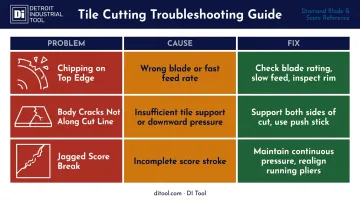
Problem: Chipping Along the Top Edge of the Cut
The blade is likely too coarse, the feed speed too fast, or the blade is worn out. A worn diamond blade loses cutting efficiency and drags rather than cuts.
- Confirm the blade is rated for glass (continuous rim, fine grit)
- Reduce feed speed until the blade cuts without resistance
- Inspect the blade rim — if diamond exposure is minimal or the rim looks glazed, replace it
Problem: Tile Cracking Across the Body (Not Along the Cut Line)
This usually points to insufficient support under the tile, or too much downward hand pressure causing the tile to flex.
- Ensure both sides of the tile are supported on the sled throughout the cut
- Reduce hand pressure to light guiding contact only — avoid pushing down
- For small tiles, use a push stick or backing board to maintain control without adding flex
Problem: Uneven or Jagged Break When Using a Scoring Wheel
An incomplete score line is the most common culprit — the wheel lifted off mid-stroke, pressure was inconsistent, or the running pliers were placed off-center.
- Confirm the score produces a continuous crackling sound across the full tile length
- Apply consistent, firm pressure for the complete stroke without lifting the wheel
- Align the center ridge of the running pliers precisely on the score line before snapping
Conclusion
Clean glass tile cuts come down to three controllable factors: the right blade (continuous-rim diamond, fine or ultra-fine grit), the right technique (slow feed, continuous water flow, full tile support), and proper finishing (smoothing every cut edge before installation).
The investment in correct tooling and a few practice cuts on scrap tile costs far less than replacing damaged tiles mid-project. Start with the right continuous-rim diamond blade — blade selection drives every outcome that follows.
Frequently Asked Questions
What is the best tool to cut glass tile without chipping?
A wet saw with a continuous-rim diamond blade rated for glass is the most reliable option for clean, chip-free cuts, especially on larger tiles and straight cuts. Scoring wheels and nippers work well for small tiles or curved detail cuts where the wet saw isn't practical.
How do you cut glass tile without chipping the back?
For back-painted glass tile, place it face-side down on the wet saw sled so the blade enters from the painted side, keeping any chipping on the non-visible face. For standard glass tile, support both sides of the cut fully to prevent flex-induced bottom chipping.
Can you cut glass tile with a regular tile saw?
Yes, but only if you swap the blade. The segmented blades typically installed on tile saws for ceramic or porcelain will chip and crack glass tile. The saw itself is fine — the blade must be replaced with a continuous-rim diamond blade specifically rated for glass before cutting.
What blade should I use to cut glass tile on a wet saw?
Use a continuous-rim diamond blade with fine or ultra-fine grit, rated specifically for glass tile. Segmented blades will chip and crack glass. Blade quality directly impacts cut cleanliness — DI Tool's glass tile blades are designed for glass's brittle, non-porous surface and produce consistently clean edges.
How do you smooth rough edges after cutting glass tile?
Use a rubbing stone or diamond hand pad with light circular pressure on a wet edge. Work from coarser to finer grit for a clean, polished result. Complete this step before installation — smoothing after the tile is on the wall is not practical and won't prevent stress-concentration cracking.
Can you cut glass mosaic tile sheets without breaking individual tiles?
Score the full sheet along the cut line, then break individual tiles along the mesh backing one at a time rather than snapping the whole sheet. On a wet saw, cut the ends of the sheet before the middle to reduce breakage across interior tiles.