
The diamond blade is the right tool, but blade type, water flow placement, feed rate, and tile orientation all determine whether your cuts come out clean or trashed. A generic ceramic tile blade or poor technique will chip edges even on a quality wet saw.
This guide covers exactly what equipment you need, the full cutting process, the variables that control cut quality, and the mistakes that waste the most tile.
Key Takeaways:
- Use a continuous rim diamond blade specifically rated for glass — not a standard tile blade
- Always wet-cut with water contacting the blade rim at the exact cutting point
- Dress the blade with a fine-grit abrasive stone before the first cut
- Feed slowly and steadily — never rush or push down
- Cut back-painted glass tiles face-down to protect the decorative coating
What You Need Before Cutting Glass Tile With a Diamond Blade
Equipment and Blade Requirements
Use a glass-specific continuous rim diamond blade — standard ceramic or porcelain blades won't work here. Those blades use coarser diamond grit in higher concentrations, cutting fast but rough and producing severe edge chipping on glass. A continuous rim blade has no gaps or segments in the cutting edge, which minimizes vibration and abrades glass gradually rather than tearing through it.
Blade sizes for wet tile saws typically run 4" to 10", with a 5/8" arbor being the most common fit for consumer and professional tile saws. Always confirm your blade's RPM rating matches your saw — DEWALT's glass tile blade (DWA4769), for example, is rated to MAX 6,000 RPM.
DI Tool's Glass Tile Diamond Blade is purpose-built for glass tile cutting, with a different specification profile than their ceramic and porcelain blade lineup.
Your wet saw must deliver water directly to the blade at the cutting contact point, not just sprayed above it. As His Glassworks documents, water that misses the blade-to-glass interface provides no effective cooling or lubrication, regardless of how much flows through the system.
Safety and Workspace Readiness
Required safety gear and setup:
- Safety goggles — flying glass fragments are the primary hazard
- Cut-resistant gloves — for handling sharp-edged tiles before and after cuts
- Dust mask — fine glass particles are a respiratory hazard
- Clean, flat workspace — grit or debris under the tile scratches unprotected surfaces
- Masking tape — applied along the cut line to reduce surface chipping and help the blade track
- Grease pencil or marker — for marking cut lines on glass without scratching
- Fine-grit abrasive dressing stone — to prepare the blade before use
DI Tool carries cut-resistant nitrile-coated gloves and safety eyewear suited to tile work. For dust masks and additional PPE, reach out to DI Tool directly at (800) 678-8006.
How to Cut Glass Tile With a Diamond Blade: Step-by-Step
Step 1: Mark and Prepare the Tile
Measure and mark your cut line using a grease pencil. Apply masking tape along the cut line on the tile face — this reduces surface chipping and gives the blade a more stable tracking surface. Before placing the tile on the saw bed, wipe the bed clean. A single glass fragment between the tile and the saw table can scratch or destabilize the tile mid-cut.
Step 2: Set Up the Wet Saw and Blade
- Mount the blade — confirm the arbor fits correctly and tighten to spec
- Verify RPM — your saw's RPM must not exceed the blade's rated maximum
- Position the water nozzle — direct flow to the blade's cutting edge at the point of glass contact, not the top of the blade body
- Test water flow before starting the motor — turn on water first and confirm it reaches the rim; adjust nozzle angle if needed
- Set flow to maximum if your saw allows flow regulation
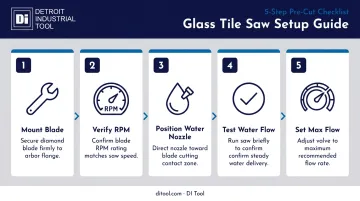
Water positioning is where most setups fail. If flow is hitting the side of the blade or pooling on the saw table, it's not reaching the cut point — where heat and friction actually build.
Step 3: Dress the Blade Before Cutting
New diamond blades often have glazed cutting edges — the bonding matrix coats the diamonds, reducing cutting aggression from the first use. Run the blade against a fine-grit abrasive dressing stone for several passes to expose fresh diamond particles before any glass contact.
For glass-rated blades specifically, only use a proper dressing stone. Materials that are too coarse can damage the fine continuous rim these blades depend on.
Step 4: Make the Cut
Tile orientation:
- Standard glass tile → cut face-up
- Back-painted glass tile → cut face-down (blade exits through the face side, not the painted coating)
Feed the tile into the blade slowly and steadily using forward pressure only — no downward force. Let the blade grind, don't push it. Montolit's glass tile cutting guidelines are clear on this: forcing the cut or rushing directly causes cracking and chipping.
For thin or delicate tiles, make a light scoring pass first, then complete the cut on a second pass. Support both sides of the tile throughout — unsupported tile flexes and snaps.
Step 5: Smooth and Finish the Cut Edge
Cut edges will be sharp and may have minor roughness. Use a diamond hand pad or rubbing stone with water to smooth edges using light circular pressure. Work from coarser to finer grit if you have multiple grits available. Keep the tile edge wet throughout to control heat and glass dust.
Key Parameters That Affect Cut Quality
Two installers can use the same blade and saw and get completely different results. The difference comes down to four variables.
Water Flow Placement
TileLetter notes that glass conducts heat poorly — localized heat at the cut point creates thermal stress while adjacent glass stays cool, causing cracking. Water must contact the blade rim exactly where it meets the glass, not just somewhere on the blade body. Verify this contact before every cutting session, not just during initial setup.
Feed Rate
Glass is brittle and responds poorly to vibration. Pushing the tile too quickly into the blade increases lateral stress and vibration, fracturing edges. Keep the feed rate slow and steady. The right pace produces consistent, light resistance and a steady grinding tone — not a labored or stuttering cut. No fixed mm/second target applies; let sound and feel guide you.
Blade Type and Diamond Grit
| Blade Type | Grit | Effect on Glass |
|---|---|---|
| Glass-specific continuous rim | Fine | Clean grind, minimal chipping |
| Standard ceramic/porcelain | Coarse | Tears through glass, heavy chipping |
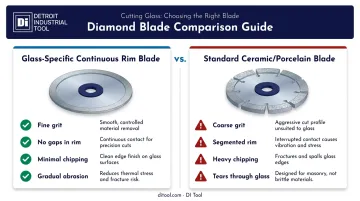
Wrong blade type produces ragged edges regardless of feed technique. Grit selection is non-negotiable with glass.
Blade Sharpness (Dressing State)
Diamond blades don't dull like steel. They glaze. The bond matrix coats the diamonds, reducing cutting aggression and increasing friction. A glazed blade generates more heat and vibration, both of which damage glass.
Signs of a glazed blade:
- Slower cutting than usual
- Increased edge chipping
- Audible pitch change or vibration increase
- The tile feels like it's being pushed rather than cut
Dress the blade with an abrasive dressing stone to restore performance.
Common Mistakes When Cutting Glass Tile
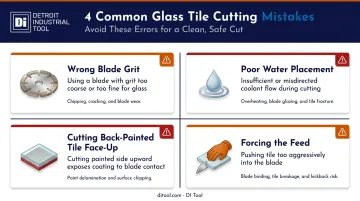
Four errors cause the majority of cracked tiles, chipped edges, and ruined installations:
- Wrong blade grit: A standard ceramic or porcelain blade tears glass instead of grinding it. Glass-specific blades from QEP run around $37 for a 7" blade; MK Diamond and RUBI options run $79–$107. That's a real cost difference — until you factor in glass mosaic at $17–$25+ per square foot and what wasted cuts actually cost.
- Poor water placement: Water pooling on the table or splashing away from the blade isn't cooling the cut. Signs you have a problem: the tile feels warm after a pass, you see steam, or there's a dry contact zone at the blade/tile interface.
- Cutting back-painted tiles face-up: The decorative coating sits on the underside. Cut face-up and the blade exits through the painted surface, chipping the finish on the exit side — a defect that shows in the finished installation.
- Forcing the feed: The most common beginner error. More downward pressure doesn't speed up a diamond blade — it increases vibration and heat, producing cracks and ragged edges instead of clean cuts.
Troubleshooting Common Problems
Chipping Along Cut Edges
Chipping usually traces back to one of four culprits: wrong blade type, too-fast a feed rate, water not reaching the cut point, or cutting back-painted tile face-up.
To fix it:
- Confirm the blade is a glass-rated continuous rim
- Slow your feed rate
- Verify water is contacting the blade rim at the cut
- Invert back-painted tiles so the painted face is down
- Apply masking tape along the cut line as an extra buffer
Blade Cuts Slowly or Stops Cutting Efficiently
A glazed blade is the most common culprit — the bonding matrix has sealed over the diamonds, preventing them from cutting. Dress the blade with a fine-grit abrasive dressing stone to expose fresh diamond grit. If dressing doesn't restore performance, the blade needs replacement.
Also check your water flow. Insufficient cooling accelerates glazing, so low water volume can turn a minor slowdown into a fully spent blade.
Tile Cracks Mid-Cut
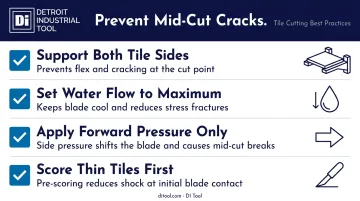
Mid-cut cracks usually come from one of three sources: unsupported tile flexing, thermal shock from low water flow, or downward pressure on the blade.
- Support both sides of the tile for the entire cut — never let one side hang free
- Set water flow to maximum
- Apply forward pressure only; never push down on the tile
- For thin tiles, make a light scoring pass before committing to the full cut
Alternatives to Cutting Glass Tile With a Diamond Blade
A diamond blade wet saw is the best method for most glass tile cutting. Two alternatives are practical in specific situations.
Score-and-Snap (Manual Glass Tile Cutter)
- Best for: Small-scale projects, simple straight cuts on thin standard glass tile, or when a wet saw isn't available
- No water setup required and costs less upfront, but limited to straight cuts with rougher edges — avoid on mosaic tile or back-painted glass where chipping risk is high
- RUBI notes that glass tile larger than 4" typically requires a wet saw
Angle Grinder With a Glass-Specific Diamond Blade
- Best for: Curved cuts, notches, or trimming glass tile already installed on a wall
- More portable than a wet saw, but requires a blade rated for angle grinder use at the correct RPM, continuous water application, and steady hand control
- Chipping risk is higher than with a wet saw, and edges will need post-cut smoothing
Frequently Asked Questions
How do you cut glass tile without it chipping?
Chip-free cuts need three things working together: a continuous rim diamond blade rated specifically for glass, maximum water flow directed at the blade's cutting contact point (not just anywhere on the blade), and a slow, steady feed rate without forcing the cut.
Do you cut glass tile face up or face down?
Standard glass tile is cut face-up. Back-painted glass tile must be cut face-down (the blade then exits through the face side rather than the painted coating). Cutting back-painted tile face-up chips the decorative finish on exit, leaving visible damage.
What is the best tool to cut glass tile?
A wet tile saw fitted with a glass-specific continuous rim diamond blade produces the cleanest cuts with the least chipping. For curved cuts, notches, or trimming already-installed tile, an angle grinder with a glass-rated blade is the next best option.
Can you use a regular tile diamond blade on glass tile?
A standard ceramic or porcelain tile blade will physically cut through glass, but its coarser diamond grit produces significant edge chipping and surface damage. A blade with fine-grit continuous rim construction, rated specifically for glass, is required for quality results.
Do you need water when cutting glass tile with a diamond blade?
Water is essential. It cools the blade at the cut point to prevent thermal shock cracking, clears glass particle debris, and extends blade life. Water must contact the blade rim exactly where it meets the glass, not just sprayed above the blade or pooled on the saw table.